How to prepare a Rotisserie session: Difference between revisions
(New page: ==How to prepare a Rotisserie session== In this section, we give you guidance of how to prepare the Rotisserie. '''Creating an account:''' 1.Go to the [http://h2o.law.harvard.edu/index....) |
BerkmanSysop (talk | contribs) (moved footer to template) |
||
| (24 intermediate revisions by 6 users not shown) | |||
| Line 1: | Line 1: | ||
This section provides guidance for instructors preparing new Rotisserie sessions for new classes. | |||
You may either reuse the questions we are providing in this course, or start preparing your own questions. | |||
You should be organizing the dates when these questions will be sent to your students and the deadlines they will have to respect to answer those questions. Two examples of [http://cyber.law.harvard.edu/copyrightforlibrarians/Calendar calendar] are available, one with one module per day, one with one module per month, depending on the availabilities of your participants. | |||
While the self-taught course does not foresee live tutoring or moderation of answers to substantial copyright questions from the learners, or evaluate their answers, the [http://cnx.org/content/col10573/latest/ Rotisserie] platform hosting assignments is meant to ensure sustainable self-training and interactive discussion without heavy administrative or technical intervention during the sessions. If desirable, an administrator can modify the Rotisserie deadlines or add more rounds, for instance, if one question raises an interesting discussion that deserves to be continued after the initial deadline. | |||
For more information, please visit the [http://h2o.law.harvard.edu/help/help_overview.jsp Help] section of the Rotisserie. | |||
__TOC__ | |||
== Create an account == | |||
The first step is to create an account. You will need an account in order to participate in the Copyright for Librarians course Rotisserie project. Follow the instructions below to register and create your login. | |||
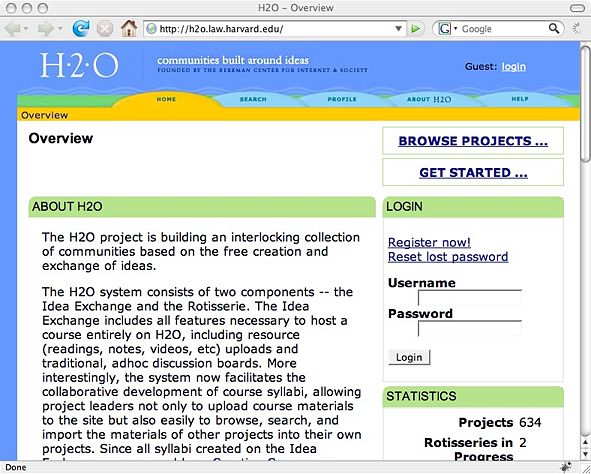
1. Go to the [http://h2o.law.harvard.edu/index.jsp Rotisserie] main website and click on the '''Register now!''' link. | |||
<div style="border: 1px dashed grey; padding: .5em 1em; margin: 3px 3px 1em 3px; width: 591px;"> | |||
[[Image:1.jpg|591px]] | |||
</div> | |||
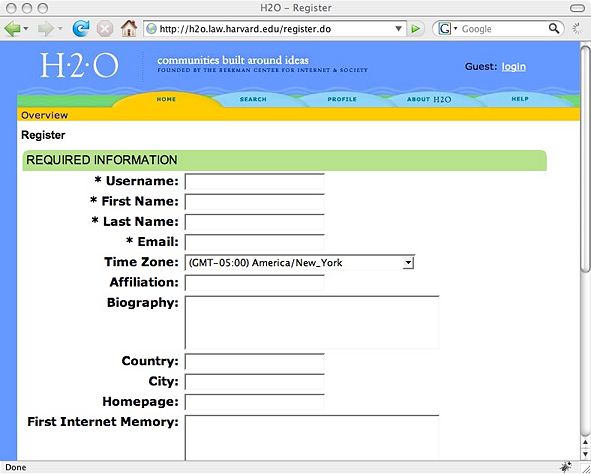
2. Fill in the form with your personal information or with information about your institution. | |||
<div style="border: 1px solid #bbee88; padding: .5em 1em; background-color:#e1f9cd; margin: 3px 3px 1em 3px;"> | |||
When you participate in a Rotisserie discussion, your username will appear next to your input. Decide here whether you want to use a pseudonym or a username close to your real name. With a pseudonym your colleagues may have difficulty recognizing your contributions to the discussion. | |||
Please remember your username and password. To participate in the assignment and discussion sessions after each module you will need to log in to the Rotisserie session. | |||
It is important that you correctly fill in the Time Zone. Deadlines are synchronized for time zone so all participants have adequate time to finish assignments, regardless of where location. | |||
</div> | |||
2. | <div style="border: 1px dashed grey; padding: .5em 1em; margin: 3px 3px 1em 3px; width: 591px;"> | ||
[[Image:2.jpg|591px]] | |||
</div> | |||
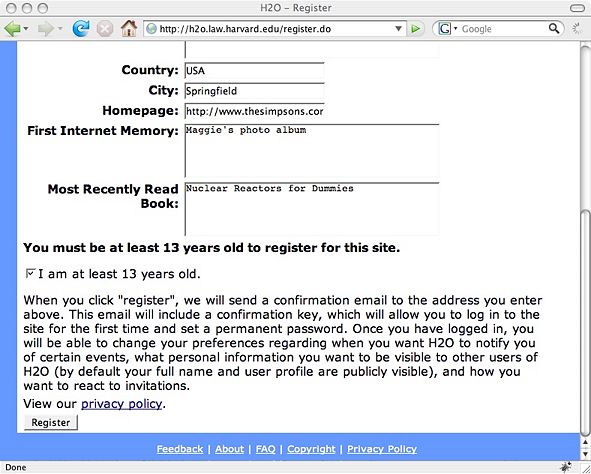
3. | 3. After filling in the form, select the “Register” button at the bottom of the form. | ||
<div style="border: 1px dashed grey; padding: .5em 1em; margin: 3px 3px 1em 3px; width: 591px;"> | |||
[[Image:3.jpg|591px]] | |||
</div> | |||
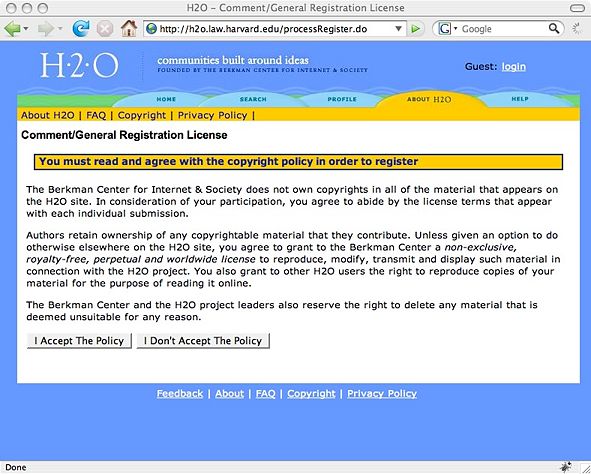
4. Read the “General Registration License” and select the button “I accept the policy”. | |||
<div style="border: 1px dashed grey; padding: .5em 1em; margin: 3px 3px 1em 3px; width: 591px;"> | |||
[[Image:4.jpg|591px]] | |||
</div> | |||
5. The Rotisserie application will send you a confirmation email to the address you specified in the previous form. Check your email and read the “Registration Confirmation Email” message. | |||
6. Using the “Confirmation Key” provided in the confirmation email, type in your new password and select the “Activate Password” button. | |||
<div style="border: 1px dashed grey; padding: .5em 1em; margin: 3px 3px 1em 3px; width: 591px;"> | |||
[[Image:5.jpg|591px]] | |||
</div> | |||
7. You should now be registered and logged in. To start creating follow the instructions in the next section. | |||
== Creating a project == | |||
To create a project you need to prepare the questions or reuse the prepared questions we provide in this course. You will also need to organize the dates when these questions will be sent to your students and the deadlines they will have to respect to answer those questions according to the [http://cyber.law.harvard.edu/copyrightforlibrarians/Calendar calendar]. The following steps outline this process. | |||
1. After having created your account in the [http://h2o.law.harvard.edu/ViewProject.do?projectID=1012 Rotisserie], go to the Overview page and select the “Create a project” link; | |||
<div style="border: 1px dashed grey; padding: .5em 1em; margin: 3px 3px 1em 3px; width: 591px;"> | |||
[[Image:6.jpg|591px]] | |||
</div> | |||
2. Fill in the form with the project's name, the starting and ending dates, the registration deadline, affiliation and keywords. After having written your project's description and settled your preferences in the project's options section, select the button create a project. | |||
<div style="border: 1px dashed grey; padding: .5em 1em; margin: 3px 3px 1em 3px; width: 591px;"> | |||
[[Image:7.jpg|591px]] | |||
</div> | |||
3. Go through the Project Licence Agreement and answer if you agree or not with the terms presented to you; | |||
<div style="border: 1px dashed grey; padding: .5em 1em; margin: 3px 3px 1em 3px; width: 591px;"> | |||
[[Image:8.jpg|591px]] | |||
</div> | |||
4. After having prepared your project, it is time to fill in the available sections on the Rotisserie; | |||
== Filling in the Rotisserie and setting up the questions == | |||
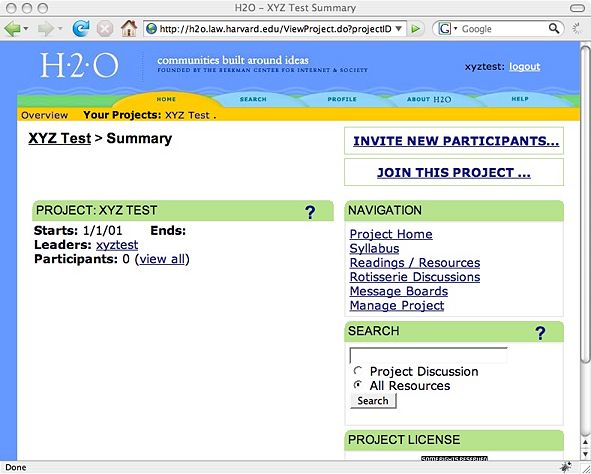
1. The Rotisserie offers many options: project home, syllabus, reading, resources, rotisserie discussions, message boards, and manage project. You may, but do not have to, use all the options. We have chosen to use the Rotisserie discussion option to host answers to assignments. | |||
<div style="border: 1px solid #bbee88; padding: .5em 1em; background-color:#e1f9cd; margin: 3px 3px 1em 3px;"> | |||
To customize your project further, pick items within the '''Navigation''' box on the right of the Rotisserie window. Within each of these pages '''Edit''' or '''Add''' content according to what you would like displayed on your project page. | |||
</div> | |||
<div style="border: 1px dashed grey; padding: .5em 1em; margin: 3px 3px 1em 3px; width: 591px;"> | |||
[[Image:9.jpg|591px]] | |||
</div> | |||
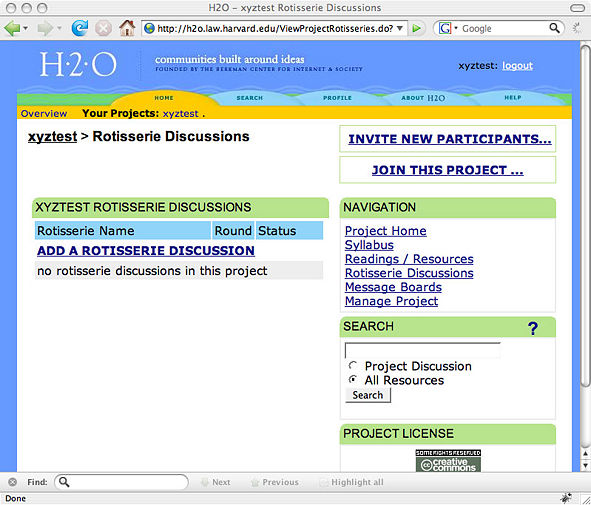
2. To set up the questions for your course, select “Rotisserie Discussions”. | |||
3. Select "Add a Rotisserie Discussion". | |||
<div style="border: 1px dashed grey; padding: .5em 1em; margin: 3px 3px 1em 3px; width: 591px;"> | |||
[[Image:12.jpg|591px]] | |||
</div> | |||
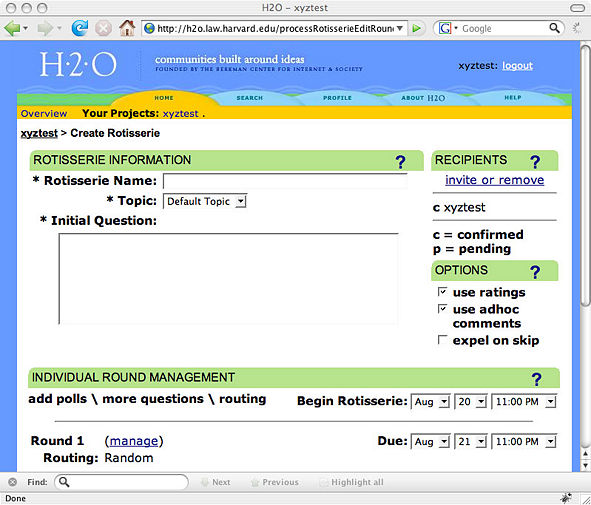
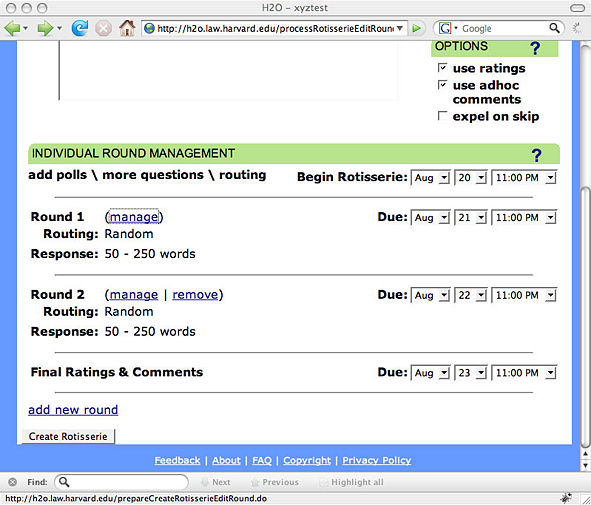
4. Fill in the options available in the "Create Rotisserie" section, and create as many rounds of discussions as you want. | |||
<div style="border: 1px dashed grey; padding: .5em 1em; margin: 3px 3px 1em 3px; width: 591px;"> | |||
[[Image:13.jpg|591px]] | |||
</div> | |||
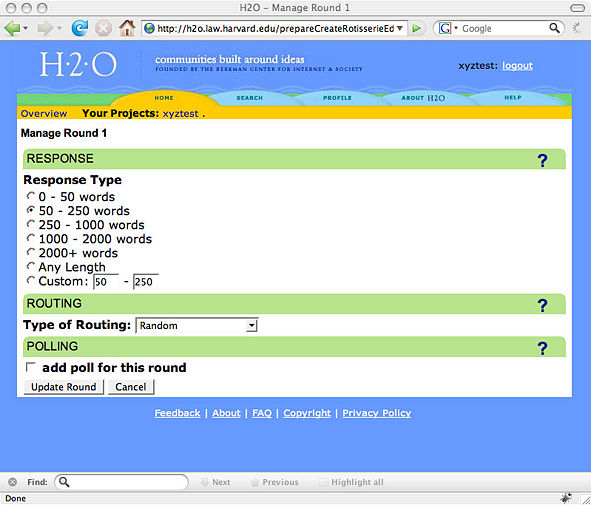
5. To select the response type, the type of routing and/or to add a poll for each round, select “Manage”. | |||
<div style="border: 1px dashed grey; padding: .5em 1em; margin: 3px 3px 1em 3px; width: 591px;"> | |||
[[Image:14.jpg|591px]] | |||
</div> | |||
6. When setting up the schedule for the beginning of the Rotisserie, be aware that once the Rotisserie starts, there is no gap between each round. Whenever a round ends (according to the selected due dates), the next round will begin, launching a new question to the participants e-mails. Rounds dates may be modified before the end of the round. | |||
7. After having organized the Rotisserie, select “Create Rotisserie”. | |||
<div style="border: 1px dashed grey; padding: .5em 1em; margin: 3px 3px 1em 3px; width: 591px;"> | |||
[[Image:15.jpg|591px]] | |||
</div> | |||
{{NavFooter}} | |||
Latest revision as of 15:29, 26 August 2009
This section provides guidance for instructors preparing new Rotisserie sessions for new classes.
You may either reuse the questions we are providing in this course, or start preparing your own questions. You should be organizing the dates when these questions will be sent to your students and the deadlines they will have to respect to answer those questions. Two examples of calendar are available, one with one module per day, one with one module per month, depending on the availabilities of your participants.
While the self-taught course does not foresee live tutoring or moderation of answers to substantial copyright questions from the learners, or evaluate their answers, the Rotisserie platform hosting assignments is meant to ensure sustainable self-training and interactive discussion without heavy administrative or technical intervention during the sessions. If desirable, an administrator can modify the Rotisserie deadlines or add more rounds, for instance, if one question raises an interesting discussion that deserves to be continued after the initial deadline.
For more information, please visit the Help section of the Rotisserie.
Create an account
The first step is to create an account. You will need an account in order to participate in the Copyright for Librarians course Rotisserie project. Follow the instructions below to register and create your login.
1. Go to the Rotisserie main website and click on the Register now! link.
2. Fill in the form with your personal information or with information about your institution.
When you participate in a Rotisserie discussion, your username will appear next to your input. Decide here whether you want to use a pseudonym or a username close to your real name. With a pseudonym your colleagues may have difficulty recognizing your contributions to the discussion.
Please remember your username and password. To participate in the assignment and discussion sessions after each module you will need to log in to the Rotisserie session.
It is important that you correctly fill in the Time Zone. Deadlines are synchronized for time zone so all participants have adequate time to finish assignments, regardless of where location.
3. After filling in the form, select the “Register” button at the bottom of the form.
4. Read the “General Registration License” and select the button “I accept the policy”.
5. The Rotisserie application will send you a confirmation email to the address you specified in the previous form. Check your email and read the “Registration Confirmation Email” message.
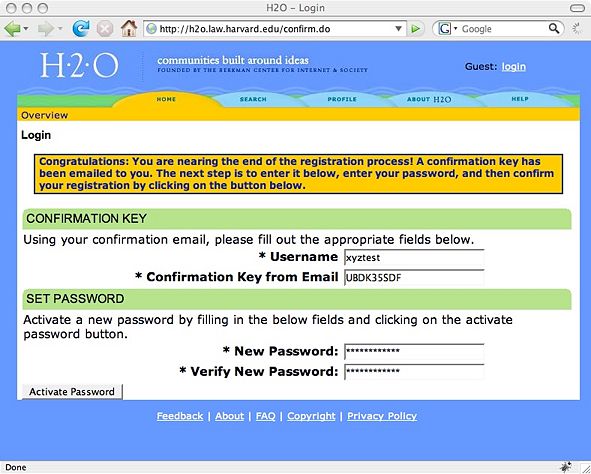
6. Using the “Confirmation Key” provided in the confirmation email, type in your new password and select the “Activate Password” button.
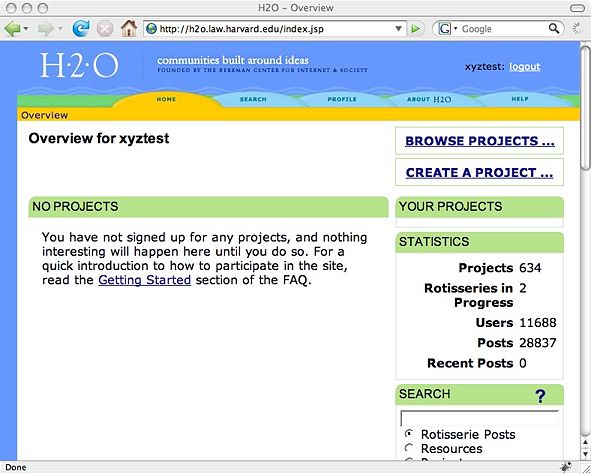
7. You should now be registered and logged in. To start creating follow the instructions in the next section.
Creating a project
To create a project you need to prepare the questions or reuse the prepared questions we provide in this course. You will also need to organize the dates when these questions will be sent to your students and the deadlines they will have to respect to answer those questions according to the calendar. The following steps outline this process.
1. After having created your account in the Rotisserie, go to the Overview page and select the “Create a project” link;
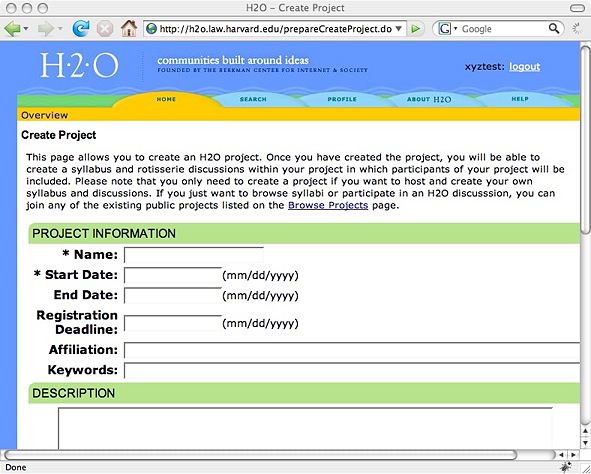
2. Fill in the form with the project's name, the starting and ending dates, the registration deadline, affiliation and keywords. After having written your project's description and settled your preferences in the project's options section, select the button create a project.
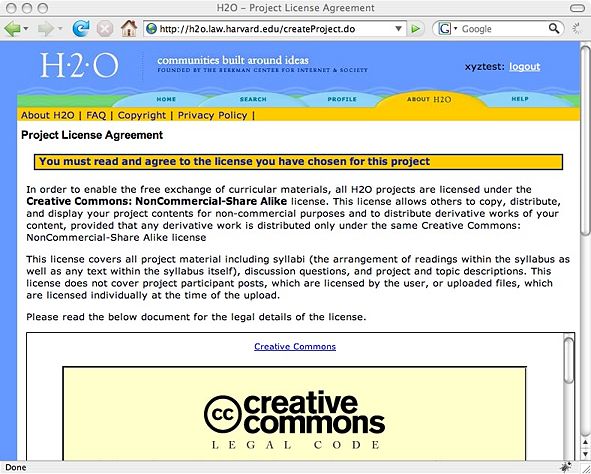
3. Go through the Project Licence Agreement and answer if you agree or not with the terms presented to you;
4. After having prepared your project, it is time to fill in the available sections on the Rotisserie;
Filling in the Rotisserie and setting up the questions
1. The Rotisserie offers many options: project home, syllabus, reading, resources, rotisserie discussions, message boards, and manage project. You may, but do not have to, use all the options. We have chosen to use the Rotisserie discussion option to host answers to assignments.
To customize your project further, pick items within the Navigation box on the right of the Rotisserie window. Within each of these pages Edit or Add content according to what you would like displayed on your project page.
2. To set up the questions for your course, select “Rotisserie Discussions”.
3. Select "Add a Rotisserie Discussion".
4. Fill in the options available in the "Create Rotisserie" section, and create as many rounds of discussions as you want.
5. To select the response type, the type of routing and/or to add a poll for each round, select “Manage”.
6. When setting up the schedule for the beginning of the Rotisserie, be aware that once the Rotisserie starts, there is no gap between each round. Whenever a round ends (according to the selected due dates), the next round will begin, launching a new question to the participants e-mails. Rounds dates may be modified before the end of the round.
7. After having organized the Rotisserie, select “Create Rotisserie”.
Course Materials:
- Module 1: Copyright and the Public Domain
- Module 2: The International Framework
- Module 3: The Scope of Copyright Law
- Module 4: Rights, Exceptions, and Limitations
- Module 5: Managing Rights
- Module 6: Creative Approaches and Alternatives
- Module 7: Enforcement
- Module 8: Traditional Knowledge
- Module 9: Activism
- Glossary
